
Need to develop a zero-touch deployment process, but don’t want to set up MDT, SCCM, or Autopilot? Those solutions are great and I recommend them, but there’s nothing like setting up your own custom process that meets your use cases exactly. Also, I like things to go fast!
In this blog, I’ll walk through how to set up a DIY imaging/provisioning process that works for Dell laptops and desktops. You’ll learn how to build a custom WinPE boot image, leverage a PowerShell script that deploys the image and automatically downloads model-specific Dell drivers, and apply a simple unattend.xml to configure Windows. Pair this with a management platform like BigFix, MEM/MECM, or Workspace ONE and you’ve got a great bare-metal imaging solution that is simple and powerful.
Let’s get to it.
Table of Contents
- Pre-Requisites
- Custom WinPE vs Setup.exe – Why go custom?
- Building Custom WinPE
- Configuring the Dell BIOS (CCTK)
- Save change to WinPE Wim
- Running the Main Script
- Dealing with Dell Drivers
- Unattend.xml
- Create Bootable USB
- Adding the files to the USB
- Recommended USBs
- Summary
Pre-Requisites
While the Dell driver downloads do initially come from the internet, the bulk of this is supposed to be used with good ol’ USB drives. You will also want to make sure to take care of the following items before you begin. You can either do them manually or use the script at the end of this section to save a bit of time.
- An empty working directory (I’ll use “C:\WinPE”)
- The latest Windows ADK and the latest WinPE Add-on for ADK
- Dell WinPE10 Driver Pack
- Windows 10 or Windows 11 ISO
- 32GB or larger USB 3.0 or USB-C Key. 16GB technically will work too but you’ll have less space for drivers.
- The core Windows and WinPE will be 64 bit
Here is a handy script I wrote to help you with steps 1-3. You can also download it from here.
#Initializing Variables
$dir = "C:\WinPE"
$source = "C:\WinPE\boot.wim"
$mountpath = "C:\WinPE\Mount"

#Creating Directories
if(!(Test-Path $dir)){
mkdir $dir
mkdir $mountpath
}

#Download and Install Win11 ADK (Backwards compatible with win10)
#Check for latest URLS here: https://docs.microsoft.com/en-us/windows-hardware/get-started/adk-install
$downloads = "$home\Downloads"
Invoke-WebRequest "https://go.microsoft.com/fwlink/?linkid=2165884" -OutFile "$downloads\adksetup.exe"
start-process -FilePath "$downloads\adksetup.exe" -ArgumentList "/quiet /features OptionId.DeploymentTools" -Wait

#Download and Install Win11 WinPE ADK (Backwards compatible with win10)
Invoke-WebRequest "https://go.microsoft.com/fwlink/?linkid=2166133" -OutFile "$downloads\adkwinpesetup.exe"
start-process -FilePath "$downloads\adkwinpesetup.exe" -ArgumentList "/quiet /features OptionId.WindowsPreinstallationEnvironment" -Wait

#Download Dell WinPE10 Pack
#Check for latest here: https://www.dell.com/support/kbdoc/en-us/000108642/winpe-10-driver-pack
$downloads = "$home\Downloads"
Invoke-WebRequest "https://downloads.dell.com/FOLDER07703466M/1/WinPE10.0-Drivers-A25-F0XPX.CAB" -OutFile "$downloads\WinPE10.0-Drivers-A25.cab"
expand "$downloads\WinPE10.0-Drivers-A25.cab" -F:* "$dir\WinPE10.0-Drivers"
For this guide, I will be doing everything with Windows 11, but the process will work just the same with Windows 10.
Custom WinPE vs Setup.exe – Why go custom?
You might be asking why even bother with going the WinPE route vs just using the standard Windows Setup with autounattend.xml as I detailed in my other blog? First, let’s go into a little background on how WinPE or Windows Setup (setup.exe) behave on first launch.
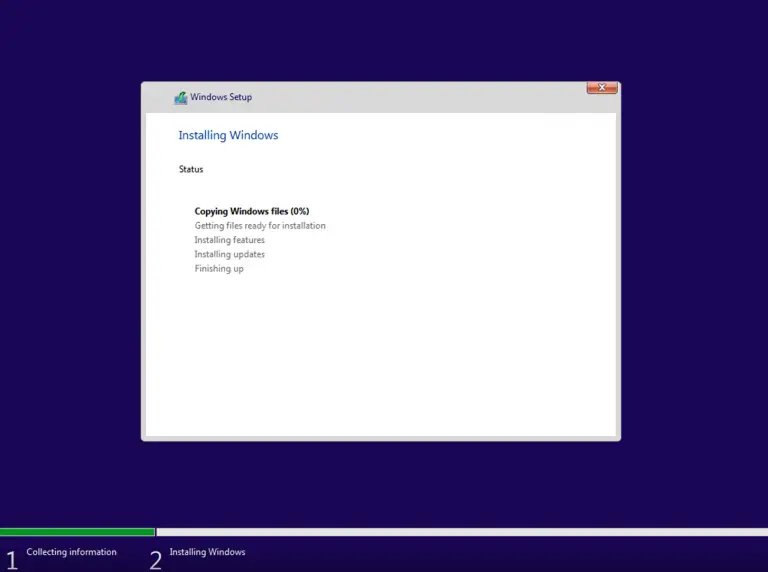
When WinPE first loads it calls the process WinLogon.exe which in turn calls Winpeshl.exe. This process looks for “%systemdrive%\sources\setup.exe” and will launch it if found. It will load the familiar Windows Setup screen:
Setup.exe is not there by default when you use WinPE from the Windows ADK kit. So if Winpeshl.exe does not find setup.exe, it will move on and look for a file called “winpeshl.ini” and if found will process what’s inside. This file is also not there by default and must be created. It looks something like this (from MS docs) and is used to call one or more applications:
[LaunchApp]
AppPath = %SYSTEMDRIVE%\Fabrikam\shell.exe
[LaunchApps]
%SYSTEMDRIVE%\Fabrikam\app1.exe
%SYSTEMDRIVE%\Fabrikam\app2.exe, /s "C:\Program Files\App3"
Running apps in this manner will bypass the command prompt and immediately launch them. Tools like MDT and SCCM do exactly this. This file needs to be saved under the “Windows\System32” folder in the place where you mount WinPE (more on that in the next section). Additionally, it will also look for and automatically process an unattend.xml file in that same location. You can also use this unattend.xml to call scripts or executables or set the screen resolution. You can see an example from my Wifi for MDT blog:
<?xml version="1.0" encoding="utf-8"?>
<unattend xmlns="urn:schemas-microsoft-com:unattend">
    <settings pass="windowsPE">
        <component name="Microsoft-Windows-Setup" processorArchitecture="amd64" publicKeyToken="31bf3856ad364e35" language="neutral" versionScope="nonSxS" xmlns:wcm="https://schemas.microsoft.com/WMIConfig/2002/State">
            <Display>
                <ColorDepth>32</ColorDepth>
                <HorizontalResolution>1024</HorizontalResolution>
                <RefreshRate>60</RefreshRate>
                <VerticalResolution>768</VerticalResolution>
            </Display>
            <RunSynchronous>
                <RunSynchronousCommand wcm:action="add">
                    <Description>Start Wireless</Description>
                    <Order>1</Order>
                    <Path>wlan.cmd</Path>
                </RunSynchronousCommand>
                <RunSynchronousCommand wcm:action="add">
                    <Description>Lite Touch PE</Description>
                    <Order>2</Order>
                    <Path>wscript.exe X:\Deploy\Scripts\LiteTouch.wsf</Path>
                </RunSynchronousCommand>
            </RunSynchronous>
        </component>
    </settings>
</unattend>
WinPE is somewhat limited in what settings can be run via unattend.xml. You can read more about what is supported here.
If neither setup.exe nor winpeshl.ini exist, then Winpeshl.exe will run “cmd.exe /k startnet.cmd”. Startnet.cmd is located in the System32 folder as well and only has one line:
wpeinit.exeThis initializes WinPE (networking, storage, etc) and then will exit to the cmd window.
The good news is that we can add things to startnet.cmd and this is exactly what we’ll do to load our primary PowerShell script.
For further reading on the topic of how WinPE startup works, I’d recommend checking out this blog and this blog.
Ok, let’s get to building WinPE!
Building Custom WinPE
Building the custom WinPE will involve several steps. First, we’ll inject the Dell WinPE drivers, then we’ll add various modules like .Net and PowerShell, customize startnet.cmd, and add in Dell CCTK files for BIOS configuration.
Assuming your following along using my sample script from the first section:
- Copy the boot.wim file from the ADK into your source directory.
echo f | xcopy "C:\Program Files (x86)\Windows Kits\10\Assessment and Deployment Kit\Windows Preinstallation Environment\amd64\en-us\winpe.wim" $source /f /y2. Mount the boot.wim file into your “$mountpath” folder. Ensure that this directory is completely empty.
Dism /Mount-Image /ImageFile:$source /index:1 /MountDir:$mountpath3. In the pre-req section you already downloaded and extracted the Dell WinPE driver pack to a folder. Since we will only be injecting 64bit drivers to our 64bit boot.wim, run this DISM command:
dism /image:$mountpath /add-driver /driver:"$dir\WinPE10.0-Drivers\winpe\x64" /recurse4. Next, we’ll add several useful modules to WinPE (like PowerShell and DISM) so that we can leverage them in our scripts.
$packagepath = "C:\Program Files (x86)\Windows Kits\10\Assessment and Deployment Kit\Windows Preinstallation Environment\amd64\WinPE_OCs"
Dism /Add-Package /Image:"$mountpath" /PackagePath:"$packagepath\WinPE-WMI.cab"
Dism /Add-Package /Image:"$mountpath" /PackagePath:"$packagepath\en-us\WinPE-WMI_en-us.cab"
Dism /Add-Package /Image:"$mountpath" /PackagePath:"$packagepath\WinPE-NetFX.cab"
Dism /Add-Package /Image:"$mountpath" /PackagePath:"$packagepath\en-us\WinPE-NetFX_en-us.cab"
Dism /Add-Package /Image:"$mountpath" /PackagePath:"$packagepath\WinPE-Scripting.cab"
Dism /Add-Package /Image:"$mountpath" /PackagePath:"$packagepath\en-us\WinPE-Scripting_en-us.cab"
Dism /Add-Package /Image:"$mountpath" /PackagePath:"$packagepath\WinPE-PowerShell.cab"
Dism /Add-Package /Image:"$mountpath" /PackagePath:"$packagepath\en-us\WinPE-PowerShell_en-us.cab"
Dism /Add-Package /Image:"$mountpath" /PackagePath:"$packagepath\WinPE-StorageWMI.cab"
Dism /Add-Package /Image:"$mountpath" /PackagePath:"$packagepath\en-us\WinPE-StorageWMI_en-us.cab"
Dism /Add-Package /Image:"$mountpath" /PackagePath:"$packagepath\WinPE-DismCmdlets.cab"
Dism /Add-Package /Image:"$mountpath" /PackagePath:"$packagepath\en-us\WinPE-DismCmdlets_en-us.cab"
Now we need to modify the startnet.cmd file. You can either do this manually (just browse to the file and edit it with notepad), or you can do it via PowerShell. This is what will call our main PowerShell script that drives the whole deployment. I’ve titled the script Apply-Image.ps1 and it will reside on the root of the USB drive. The tricky part is that you can’t guarantee what the drive letter will be once booted into WinPE. If you hard-code it to D:\ for example, it may not work on a desktop computer with multiple internal disk drives since WinPE may assign it E:\.
An easy way to solve this is to write a little loop in batch to search for the existence of that file. I’m using a modified version from what MS has documented. This will ensure that no matter what drive letter the “Apply-Image.ps1” script is located on, it will still run.
'wpeinit' | out-file "$mountpath\windows\system32\startnet.cmd" -Force -Encoding ASCII
$(@('@for %%a in (C D E F G H) do @if exist %%a:\Apply-Image.ps1 set BOOTDRIVE=%%a')) | out-file "$mountpath\windows\system32\startnet.cmd" -Force -Encoding ASCII -Append
'powershell -executionpolicy bypass -file %BOOTDRIVE%:\Apply-Image.ps1' | out-file "$mountpath\windows\system32\startnet.cmd" -Append -Encoding ASCII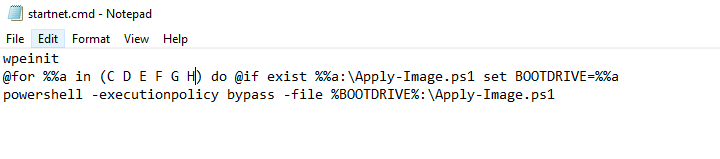
Configuring the Dell BIOS (CCTK)
Adding in the Dell Command Configure Toolkit (CCTK) files allows you to set and configure the BIOS in a consistent manner each time a system is deployed. Enabling SecureBoot, AHCI, and activating TPM are the most common settings, but there are many you can choose from. In my sample script, I’ve got around a dozen or so commands we run during builds. Add or remove as necessary. Here’s how to add necessary files to WinPE to accomplish this:
- On a Dell system, download the Dell CCTK from here
- Once downloaded, install it and accept all defaults.
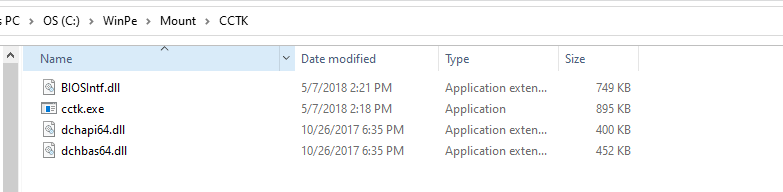
- Create a folder inside your mounted wim: C:\WinPE\Mount\CCTK
- Navigate to C:\Program Files (x86)\Dell\Command Configure\X86_64 and copy these 4 files into that “CCTK” folder:
- BIOSIntf.dll
- cctk.exe
- dchapi64.dll
- dchbas64.dll
Since these will be saved inside of WinPE, our PowerShell script will be able to leverage them and successfully make the necessary commands. Here are all of the commands we run at my org. Note that they are optimized for performance we do change some of these later on in the build process.
$Make = (Get-WmiObject -Class Win32_ComputerSystem).Manufacturer
if ($make -like "Dell*") {
    Driver-Download
    #CCTK

    cd "X:\CCTK\"

    Write-Log "Applying CCTK. Log also set to C:\Temp\cctk.log"
    # ThunderBolt Docks Connection Options
    .\cctk.exe --thunderbolt=enable -l=X:\Windows\Temp\cctk.log
    .\cctk.exe --thunderboltbootsupport=enable -l=X:\Windows\Temp\cctk.log
    .\cctk.exe --thunderboltprebootmodule=enable -l=X:\Windows\Temp\cctk.log
    .\cctk.exe --thunderboltsecuritylevel=nosecurity -l=X:\Windows\Temp\cctk.log
    .\cctk.exe --MacAddrPassThru=SystemUnique

    # Disable Legacy Boot, enable UEFI
    .\cctk.exe bootorder --activebootlist=uefi -l=X:\Windows\Temp\cctk.log
    .\cctk.exe --legacyorom=disable -l=X:\Windows\Temp\cctk.log
    .\cctk.exe --secureboot=enable -l=X:\Windows\Temp\cctk.log
    .\cctk.exe --uefinwstack=enable -l=X:\Windows\Temp\cctk.log
    .\cctk.exe --EmbSataRaid=Ahci -l=X:\Windows\Temp\cctk.log

    # USB settings
    .\cctk.exe --usbpowershare=enabled -l=X:\Windows\Temp\cctk.log

    # Set SMART Error Checking
    .\cctk.exe --smarterrors=enable -l=X:\Windows\Temp\cctk.log

    # Check TPM, enable and activate - a password is set and then removed in order to change these setting
    .\cctk.exe --setuppwd=password -l=X:\Windows\Temp\cctk.log
    .\cctk.exe --tpmsecurity=enabled --valsetuppwd=password -l=X:\Windows\Temp\cctk.log
    .\cctk.exe --tpmactivation=activate --valsetuppwd=password -l=X:\Windows\Temp\cctk.log
    .\cctk.exe --setuppwd= --valsetuppwd=password -l=X:\Windows\Temp\cctk.log

    # Image Performance Settings
    .\cctk.exe --BlockSleep=Enabled -l=X:\Windows\Temp\cctk.log
    .\cctk.exe --Fastboot=Minimal -l=X:\Windows\Temp\cctk.log
    .\cctk.exe --Speedstep=Enabled -l=X:\Windows\Temp\cctk.log
    .\cctk.exe --TurboMode=Enabled -l=X:\Windows\Temp\cctk.log
    .\cctk.exe --CStatesCtrl=Disabled -l=X:\Windows\Temp\cctk.log
}
Save change to WinPE Wim
Now that we have pre-staged Dell WinPE drivers, enabled PowerShell and other modules, modified starnet.cmd, and added Dell CCTK, we are ready to seal it up! Run this command to commit everything to the mounted wim and unmount it. Before running, make sure you don’t have any explorer windows open inside of the mounted directory.
Dism /Unmount-Image /MountDir:$mountpath /commitRunning the Main Script
Now we can get into the meat of this process. Like I mentioned earlier, the main script that drives this whole thing is called “Apply-Image.ps1”. I’ve tried to keep this script as simple as possible while still delivering the core requirements to laying down the image. Here is what it does:
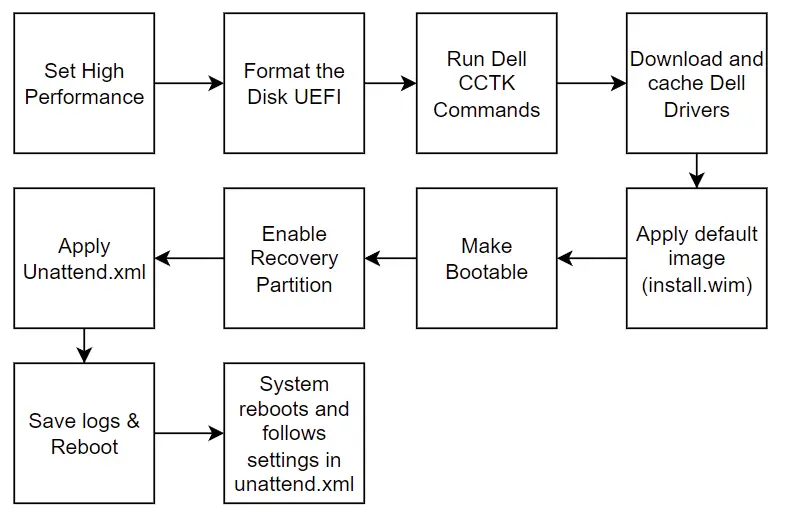
Most of the items here are fairly “standard” in that I’m generally just running standard DISM commands as documented by Microsoft. The most custom element here is the Dell driver download part. I did write this custom to solve a few problems so let’s get into those details.
Dealing with Dell Drivers
Dealing with drivers is more of the more annoying things with imaging. Having to download, extract, import, and manage drivers pack for 10, 20, or more models of devices can become quite cumbersome and is a lot of data. Additionally, with tools like SCCM or MDT you have to import them and then sync them around to the corresponding DPs or MDT shares. I took a slightly different approach with the function I wrote called “Driver-Download”.
Dell publishes a driver “Catalog” file with details about every dell model and their corresponding driver packs including download links. We can parse the XML for the specific model we are imaging and build a download URL for the specific driver pack. Thankfully Dell had a blog on how to parse the catalog file so I took that and modified it a bit.
The function dynamically downloads and stores the model-specific Dell driver packs on the fly. This saves me from having to push out gigs of driver packs to every USB key that is used in my org. As a technician images a PC, it will check the USB first to see if it has a driver pack for that model. If found, it will do a hash check just to make sure the file is fully intact and wasn’t partially downloaded from a previous run. If the hashes don’t match or it is completely missing, then it will download the driver pack for that model and save it on the USB key.
So the first time you image a model on that USB key, it will be slightly slower since it has to download it from the internet. Subsequent runs will be faster since it won’t need to re-download unless Dell updates the driver pack to a new version.
While I’ve hardcoded it to Windows 10, the catalog lists WIndows 11 driver packs as well if the model has them. This script can be modified to support either or both OS versions very easily. Additionally, since it is dynamic, we can introduce new models to the environment and the script will automatically download them during imaging. There is no need for me to pre-download ahead of time!
Unattend.xml
The unattend.xml is what drives the behavior of Windows after you apply the image in WinPE and reboot. There is a lot you can do here, but here is what I like it to generally do:
- Set computer name
- Disable UAC
- Enable a local account (that is an administrator)
- Enable auto-login to this account
- Skip OOBE screens
- Run some startup commands (RunSynchronousCommand). Note this is pre-logon stuff.
- Run first-logon commands (FirstLogonCommands)
- Install .Net framework
I’ve uploaded a sample unattend.xml file in my Github that you can use as a sample. You can also import and edit this in the Windows System Image Manager from the Windows ADK.
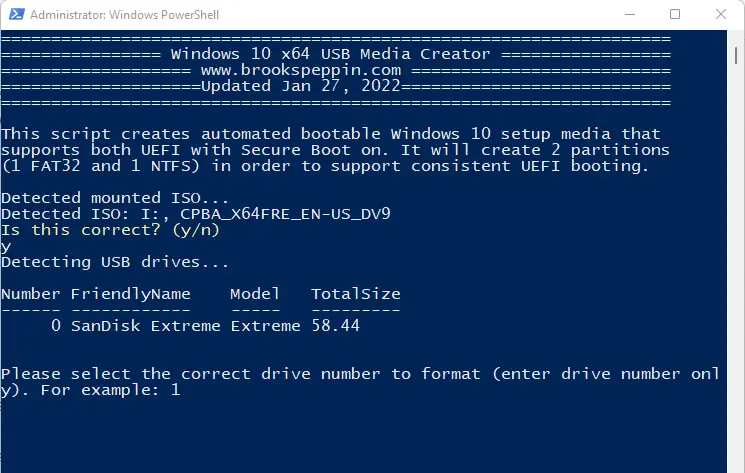
Create Bootable USB
Grab and mount the Windows 10 or 11 ISO. You can use my “Create-Win10-Media.ps1” script to create the bootable USB key. It will format the drive with two partitions: the first has all of the boot files (called “BOOT”) and is formatted FAT32, and the second holds the actual image and is formatted NTFS. This allows for full UEFI boot support for a wide range of hardware and skips us from having to split the image due to the 4GB file size limitation of FAT32.
Adding the files to the USB
Now that we have the bootable USB key with the Windows ISO files copied over, we need to copy over a few more files.
WinPE
- On the USB BOOT partition, go into the “Sources” folder and delete the boot.wim file there.
- Copy over your newly created boot.wim file from C:\WinPE
Apply-Image.ps1
- Go here for the script and save it locally.
- Copy file to the root of the BOOT partition.
Unattend.xml
- Download the sample unattend.xml or use one that you have tweaked.
- Copy it to the root of the BOOT partition.
Your USB BOOT partition should look like this:
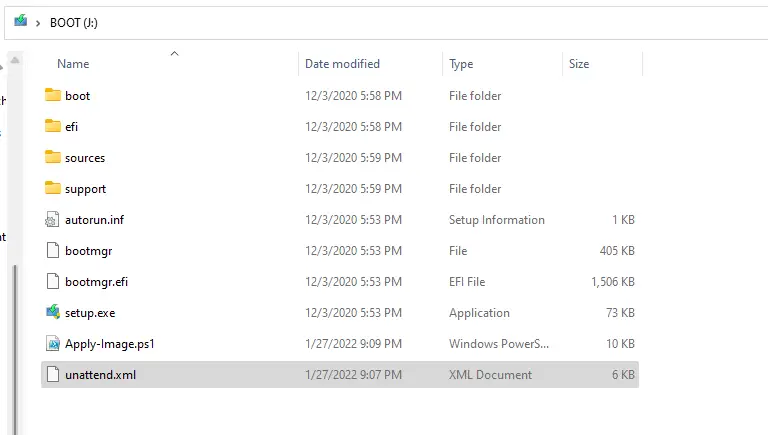
And the DATA partition should look like this:

After this, you are good to plug this into a Dell laptop and begin imaging!
Recommended USBs
Here are some USB drives I have personally used and find to work really well. I don’t make any commissions off of these links.
- SanDisk Extreme. Very fast and widely compatible for systems with USB 3.0 ports.
- SanDisk Ultra. Not as fast as the Extreme, but cheaper.
- Kingston USB-C. These things are crazy fast for systems with USB-C or use a Thunderbolt Dock. Note that some Dell systems can have a hard time seeing these as bootable in the BIOS. A trick I’ve found to fix this is to “repair” the BOOT partition or by running this in PowerShell script:
Get-Volume -FileSystemLabel "Boot" | Repair-VolumeSummary
In this blog, we reviewed how to build a custom WinPE boot image, configured it to launch a PowerShell script that applies a Windows 10 or 11 image while dynamically downloading model-specific Dell drivers, and applying an unattend.xml. My hope is that after reading this you are well equipped to deploy this in your environment or tweak it as you see fit! In my own organization, I add in installing the BigFix client to provision down all corporate applications, settings, tweaks, and domain join.
Hi Brook,
It seems that Dell now provides an exe instead of a cab, the drivers are no longer extracted to the C:\Drivers\
I noticed this with the Dell 5520 driver pack A07.
Kind regards,
Peter
Hi Brook,
I have already fixed the exe driver issue.
If you insert the following on row 141 the executable is extracted
if ($destination -contains “.exe”) {
start-process -filepath “$destination” -argumentlist “/s /e=$global:foldermodel”
}
Kind regards,
Pieter
Ah yes, I’ve been meaning to update this to support Dell’s change. Thanks!
As a heads up on this one, directly copy/pasting the above lines into my PS1 did not work, for some reason the “.exe” was pasting in with weird formatting and had to manually be entered.
Hello Brook,
This is a really great job, thank you for sharing such a detailed guide. It’s been a huge help in my deployment process.
I got a question though. In my case I would need to use it with RAID instead of AHCI. Will it work the same if I change it on CCTK or will it need some adjustments for it to work?
Many thanks,
Sergio
Sergio – Yes, simply change the command in CCTK to set it to RAID mode instead of AHCI (in WinPE). After the system reboots, it will be in RAID mode and Windows will use the Intel RST drives for storage.