
Looking to deploy BitLocker with Intune but don’t know where to start? This is one of the most common places people start when first getting into Intune. In this beginner’s guide, you’re going to learn everything you need to know about using Intune to manage BitLocker including recommended settings, how the BitLocker CSP works on the client, and tips if you are migrating from an existing solution.
Prerequisites
Before we jump into configuring, let’s take a look at the prereqs:
- A valid Microsoft Endpoint Manager (Intune) license
- Devices must be Azure AD or Hybrid Azure AD joined
- Devices must not be encrypted with third-party disk encryption like McAfee Disk Encryption or WinMagic. You will need to fully decrypt those first.
- Devices can be already BitLocker encrypted and managed with things like MBAM or McAfee MNE. We’ll go into more detail on how to deal with this.
For silent or automatic BitLocker enablement, which will be the focus of this blog, you’ll need a few more things:
- The device must have a TPM chip at version 1.2 or higher (TPM 2.0 strongly recommended)
- BIOS must be set to UEFI
- If the signed-in user is a standard user then Windows 10 1809 or newer is required. If they are a local admin then Windows 10 1803 or newer is required. Since those versions are no longer supported then as long as you are on a supported version of Windows 10 or Windows 11 then you are good.
Where to Configure It
Over the years, where you configure BitLocker in the Intune console has changed. These days, Microsoft has moved all of the “security” related items under the Endpoint Security section. While you can still configure BitLocker under the Settings Catalog or via custom-URI, the best practice is to set up everything under Endpoint Security.
Go to Endpoint Security > Disk Encryption > Create Policy.
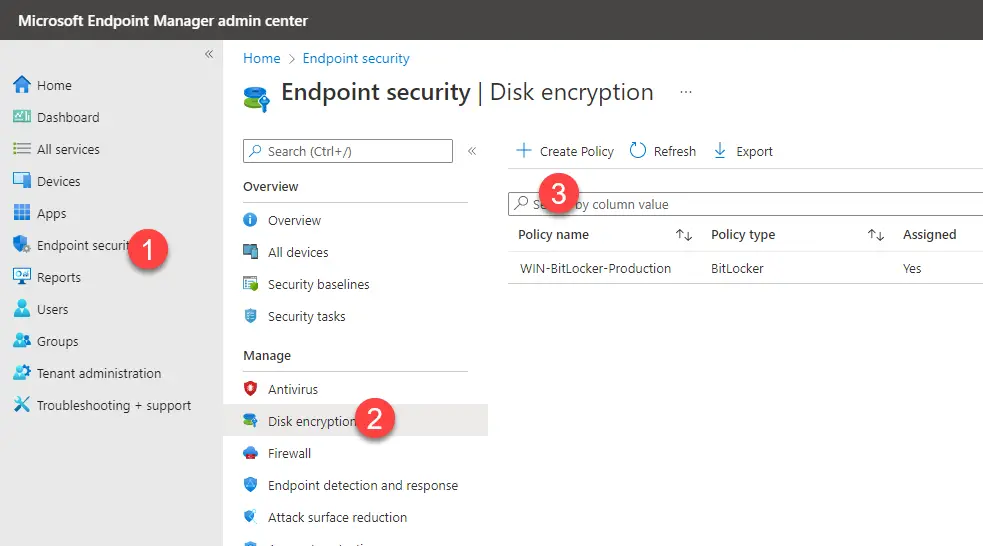
Under Platform select Windows 10 and later > BitLocker.

What settings should you set?
When you get to the configuration settings page, you may be overwhelmed with the number of different settings that you can configure. Which ones are critical to set vs. which ones are optional or just “nice” to have? Let’s break it down.
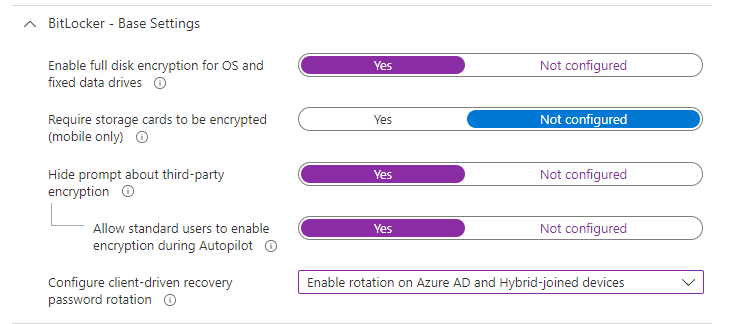
Base Settings
The first section is where you configure silent enablement and enforcement of BitLocker. The first setting, “Enable full disk encryption for OS and fixed data drives” is what “enforces” BitLocker to be turned on. The setting “Hide Prompt about third-party encryption” is what enables it silently in the background without prompting the end-user. Additionally, you can set up automatic rotation of BitLocker keys if they are used by an admin. I recommend the following configuration:
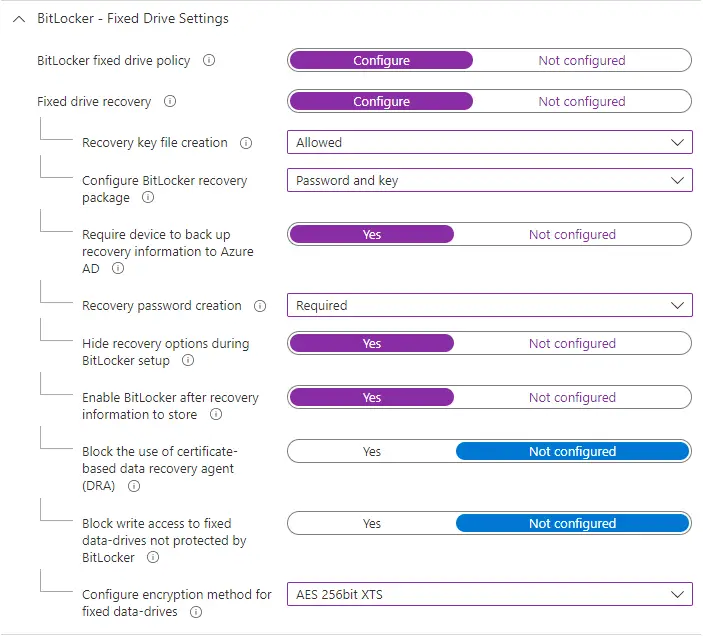
Fixed Drive Settings
Fixed drive settings apply to additional internal disks a device may have. This could be separate partitions on the main disk or a 2nd disk installed on a desktop computer. This is where the settings become a little more complicated, especially with how things can be worded in the Intune console.
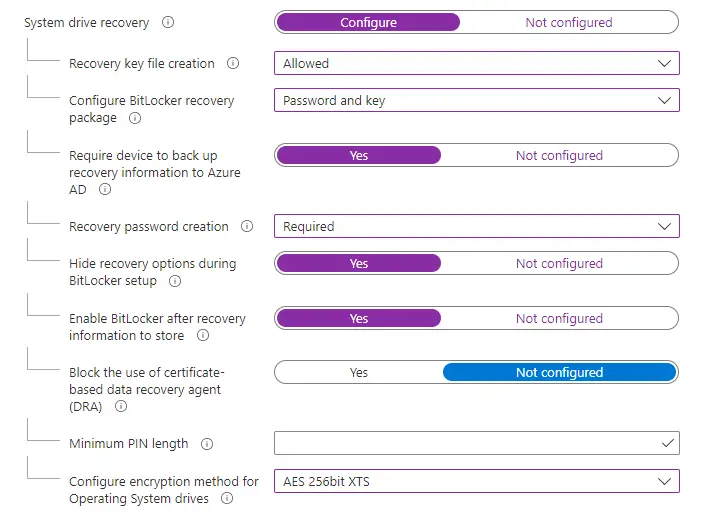
Essentially, I recommend setting things up so it enforces BitLocker with the highest encryption method (AES-XTS 256), requires a recovery password to be set (people also refer to this as a recovery “key”), and backs up the key to AAD.
For Recovery key file creation, set this to “Allowed”. It is required for silent enablement and allows an admin to manually create a recovery key file if required. Note that this is a “file” and not just the key password saved on the device.
For Configure BitLocker recovery package, set this to be “Password and key”. Note that this is only used when trying to salvage data from BitLocker encrypted disk if the password alone isn’t sufficient. You will probably never need to use this. You can read more about it here.
Ensure both Recovery password creation and Require device to back up recovery information to Azure AD are set to “Required”. This will ensure the device always has a recovery password created and saved into Azure.
OS Drive Settings
When it comes to OS drive settings, a good chunk will match what we just set for fixed drives. However, for the Operating System drive, we will also need to configure startup options. I recommend going with TPM only as it is the best user experience and PIN+TPM is overkill in my opinion. Your infosec team may disagree with that but it’s worth debating whether adding an arbitrary PIN just so the system can boot is worth it.
For Preboot recovery message, set up something basic without giving out too much org-specific information. Don’t put your company name or direct help desk number. Employees should already know how to contact the help desk and putting the number directly there will make it easier for an attacker to try to call and phish for the recovery key.
For Preboot recovery URL, I normally don’t set this up as I don’t find it particularly useful enough for end-users to be able to actually use.
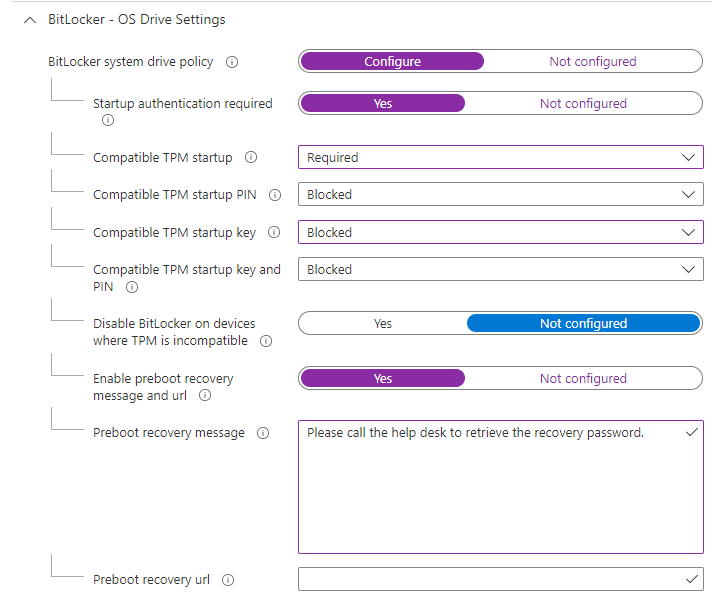
For the system drive recovery section, this should match what you have set for fixed drives, including the encryption type (AES-XTS 256).
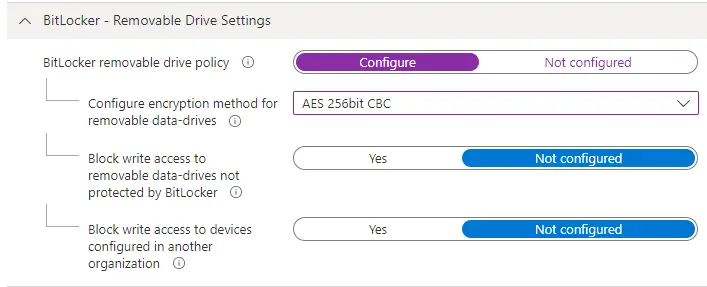
Removable Drive Settings
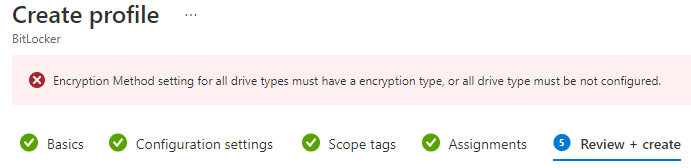
Unfortunately, even if you don’t plan to encrypt your USB keys with BitLocker, you still have to configure this section. It won’t let you save the profile if you don’t set an encryption type for removable drives. If you try, you’ll get this message:
For the encryption type, configure as needed. If you will need to use an encrypted key on another device not running a supported Windows 10 or 11 version use AES-CBC 128-bit or AES-CBC 256-bit.
This does not automatically enable BitLocker on removable devices. It just sets the encryption type if you, the admin, or the end user manually enable BitLocker on a removable drive.
Optionally, set the two “Block write access” settings as you see fit.
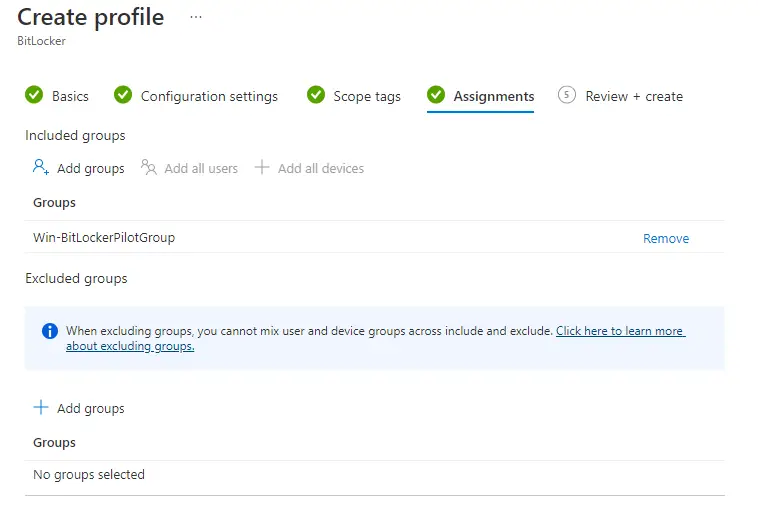
Now you can complete the wizard to save and assign out to your devices.
A Look at How they Apply to the Client
Intune uses the BitLocker CSP to apply all of the settings to the client. This CSP is a little complicated though. First, most of the settings are “ADMX-backed” which are basically traditional GPOs sent down via the MDM channel. You can read more about them here. Here’s a crash course though:
First, go to this path in the registry: HKEY_LOCAL_MACHINE\SOFTWARE\Microsoft\PolicyManager
Then expand the node: Current > device > BitLocker.
You’ll notice that each setting has 3 nodes just for one thing. For example, the EncryptionMethodbyDriveType has:
EncryptionMethodByDriveType_ADMXInstanceData
EncryptionMethodByDriveType_ProviderSet
EncryptionMethodByDriveType_WinningProvider
Or
ConfigureRecoveryPasswordRotation
ConfigureRecoveryPasswordRotation_ProviderSet
ConfigureRecoveryPasswordRotation_WinningProvider
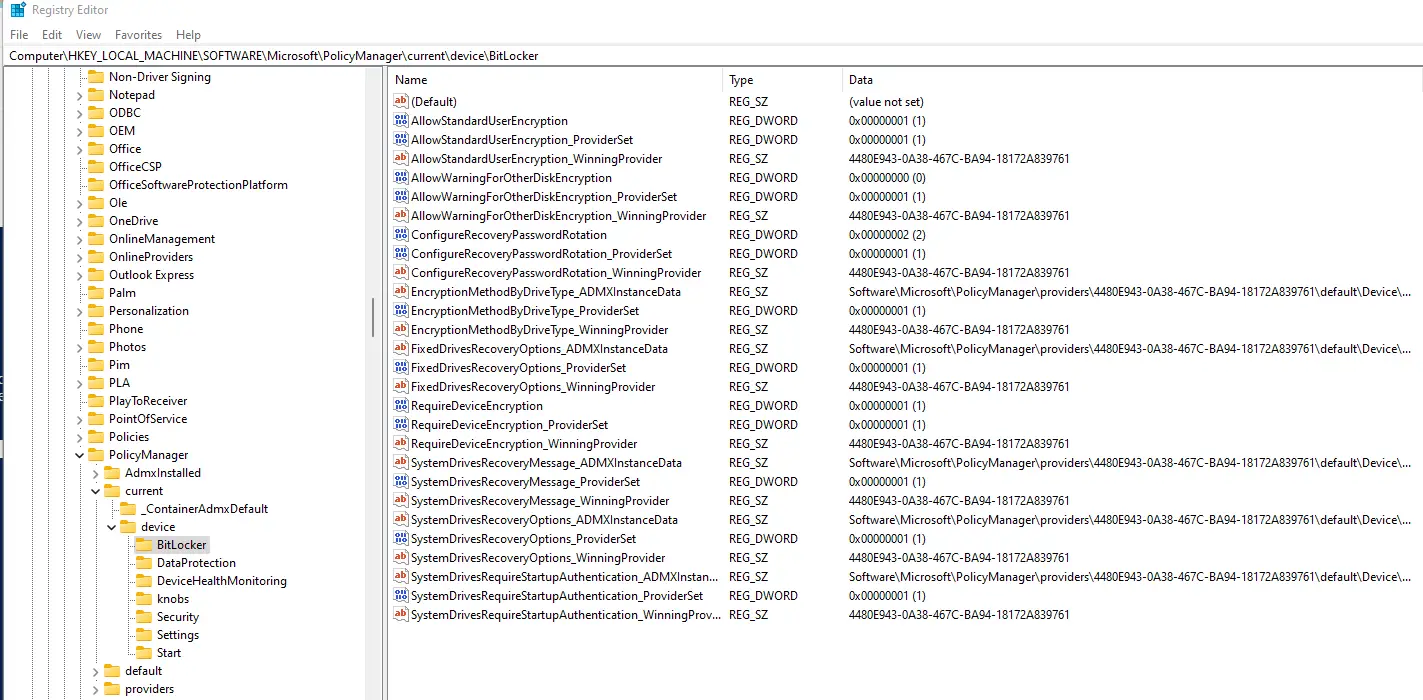
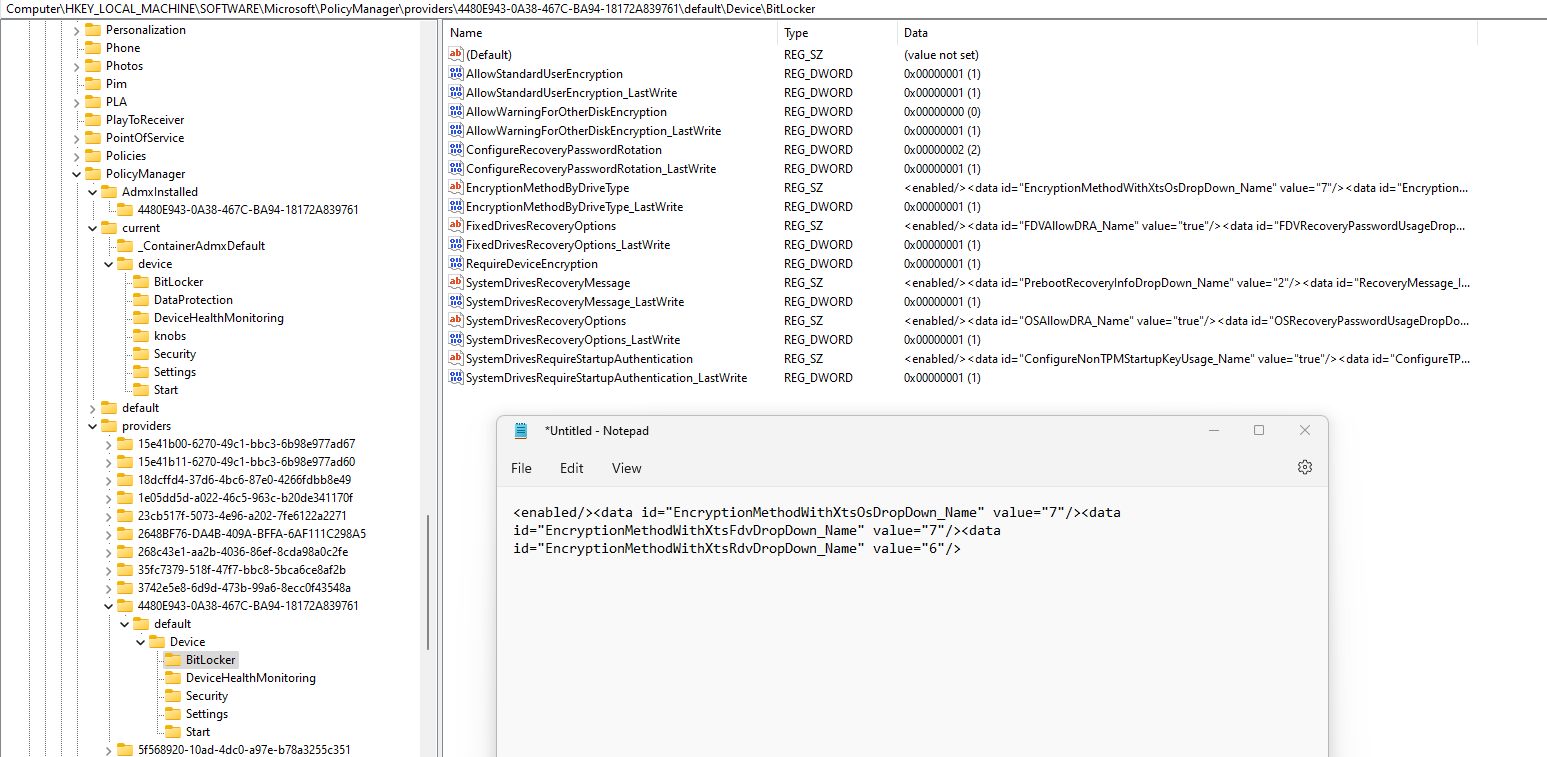
The ones with “ADMXInstanceData” reference different settings where the values are configured. If you take the GUID saved under one of the keys with “_WinningProvider” at the end (in my case it’s 4480E943-0A38-467C-BA94-18172A839761). Then expand the “providers” node, find that same GUID, and then expand again you’ll see the actual values of those settings. You can open the ones that start with “<enabled/>..” and copy/paste into notepad for easier reading.
You can also just open up one with ADMXInstanceData and it has the full path as well. For example, if I open up EncryptionMethodByDriveType_ADMXInstanceData, the full path to where that is configured is: Software\Microsoft\PolicyManager\providers\4480E943-0A38-467C-BA94-18172A839761\default\Device\BitLocker.
The important thing to know is that these settings also get converted and set in the traditional GPO area: HKEY_LOCAL_MACHINE\SOFTWARE\Policies\Microsoft\FVE

You can monitor the success or failure of these settings in the Intune console under the Profile Overview section. If you click on the BitLocker profile under Endpoint Security > Disk Encryption. You’ll see a pie chart with the overall details:
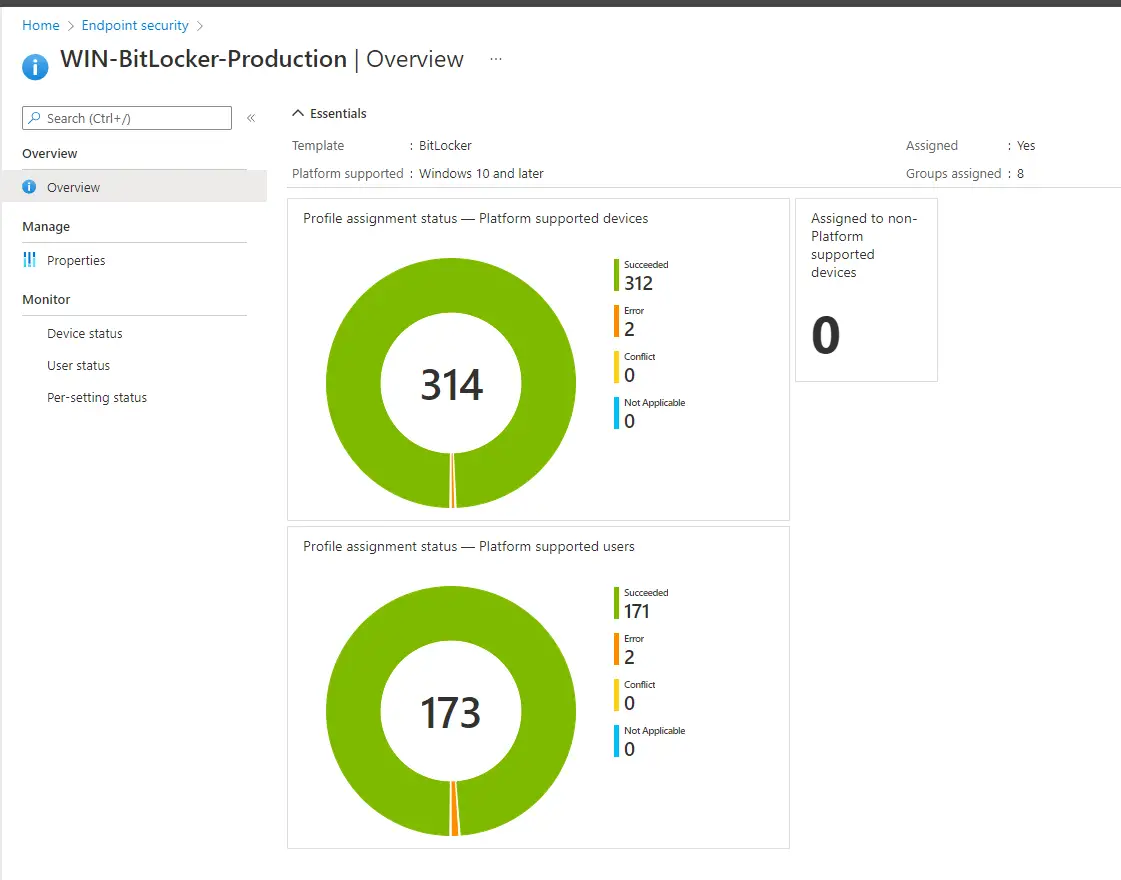
Note: You are going to see a much higher number under devices in that pie chart than are actually deployed. This is because Intune counts both the device and user each as a separate item.
Where to Check for Errors
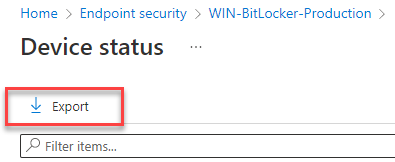
If you click on the pie chart or either the “Device Status” or “User Status” sections on the left-hand side, you’ll quickly notice that you can’t “sort” or “filter” on any of these columns like you can other areas of the console. Bummer. So how do you locate those devices that have errors like the 2 devices shown above?
One way is to click on the device status and then click “Export” at the top of the list. This will export all of the devices and then you can sort and filter that way.
A better way though is to go under the “Monitor” area under Devices. Click on Devices > Monitor.
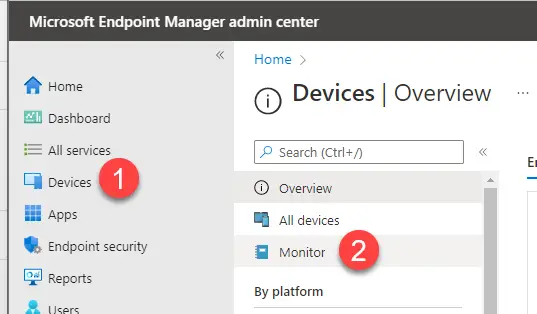
Then Assignment Failures (Preview). Find your BitLocker profile and click on it. Now it will show you just the devices that have failures.

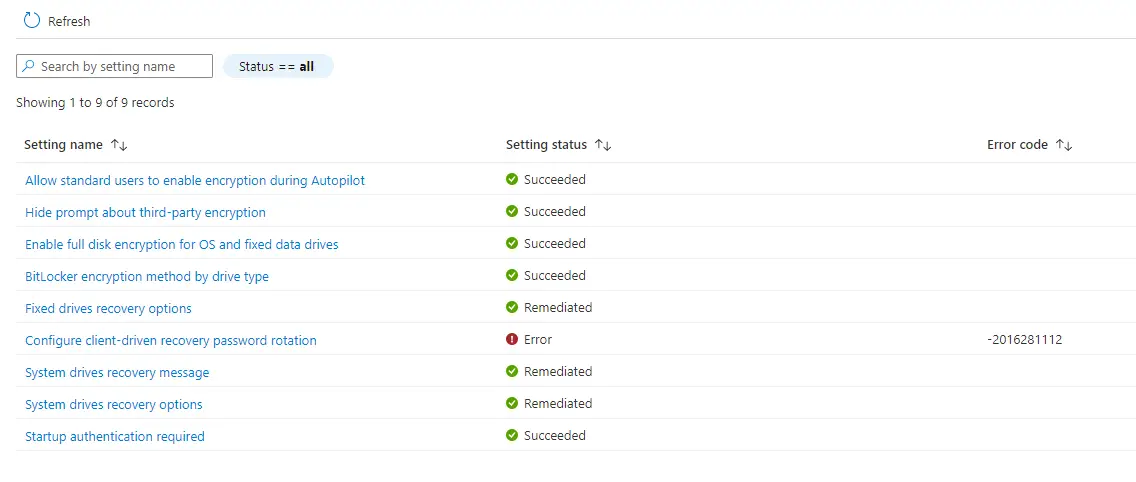
Then click on one of those devices and you can drill down to see which particular setting it is failing on.
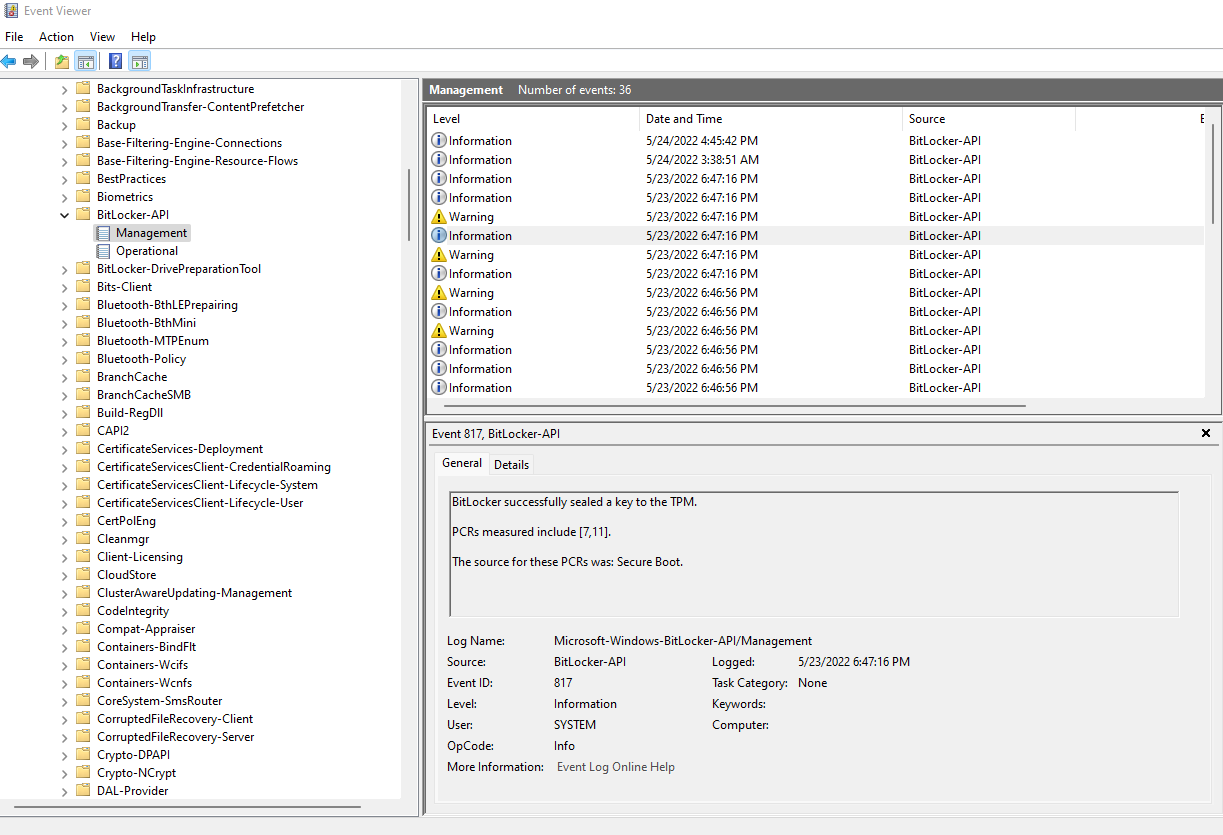
Microsoft has a pretty good article on troubleshooting BitLocker encryption on the client-side so it’s worth checking out. You can also see the majority of BitLocker errors in the event viewer. Navigate to Microsoft > Windows > BitLocker API > Management.
Or you can query this log with PowerShell:
Get-WinEvent -LogName "Microsoft-Windows-BitLocker/BitLocker Management" -MaxEvents 100 |sort TimeCreated | ft -AutoSize -Wrap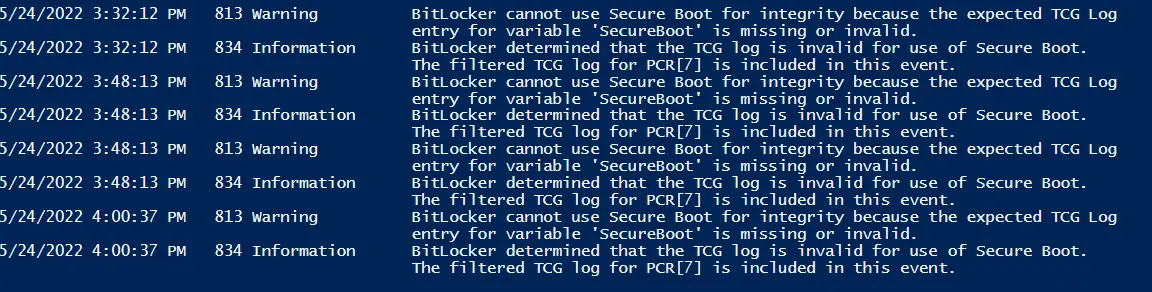
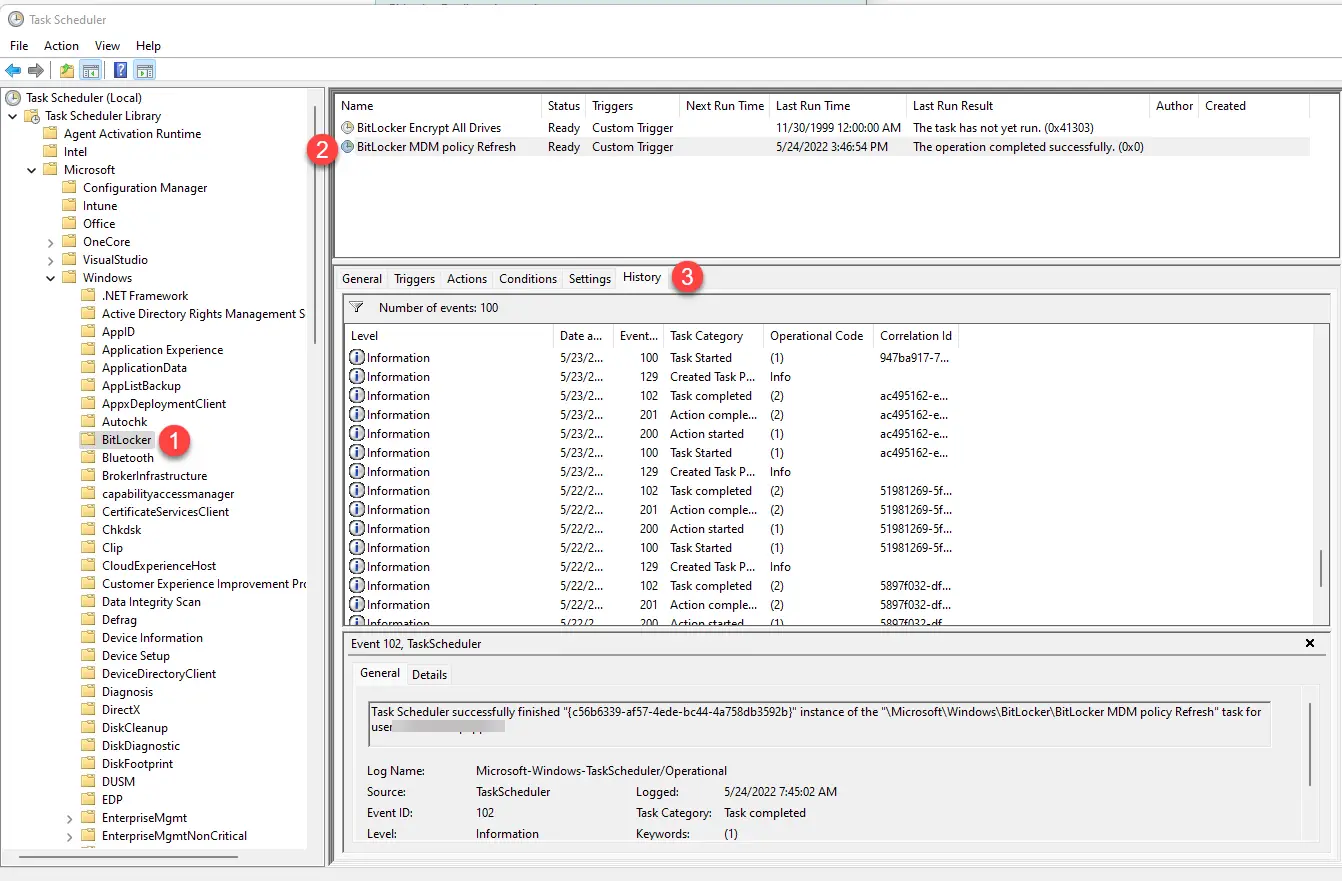
One last place you can check on the client to see whether the BitLocker settings are successfully applying is by going to Task Scheduler. Navigate to Microsoft > Windows > BitLocker and then select “BitLocker MDM Policy Refresh” scheduled task.
This scheduled task is what Intune uses to enforce the BitLocker MDM policies on the client. Click on the “History” tab, and you can see any errors here:
Deploying to Already Encrypted Devices
So what happens if you need to deploy this to already BitLocker-enabled systems? Thankfully this is fairly straightforward, but there are a few things to be aware of:
Devices will not decrypt and re-encrypt
If you deploy this profile to a device that is already BitLocker encrypted, the settings will successfully apply but nothing will happen to the encryption itself. It will remain encrypted as it is. This applies if you configuring the encryption method that matches what is already there, i.e. XTS-128 > XTS -128, or if you have a different method, i.e. XTS-128 > AES-XTS-256.
The only way you will be able to have the encryption method that you set in your profile is to fully decrypt and re-sync Intune which will automatically re-enable BitLocker with the target encryption method.
Remember that you can actually deploy a different encryption method than the one current in use on the device. In my case, the bulk of our devices where encrypted AES-256 and we deployed the Intune profile as AES-XTS-256 with no problems. We did not fully decrypt and re-encrypt existing devices (although we could have), but all net new devices will get the more secure AES-XTS-256 method.
Recovery Keys will Not Escrow to AAD
This is one of the things that I wish Intune would change. It does not automatically escrow any keys already on the device. This means you will have to manually escrow them using the BackupToAAD-BitLockerKeyProtector PowerShell command. Here is a great blog that can get you started with a sample script to escrow the keys.
This command actually backs up the key to Azure Active Directory. BitLocker keys are stored in AAD and not actually in Intune. Intune simply calls the API to Azure to query the key so that you don’t have to leave the Intune console.
I go through a lot more detail on migrating from another BitLocker management tool (like McAfee MNE) in my blog here so be sure to check that out if you need to migrate from another tool.
A Few More Things You Should Know
Before rolling this out broadly to your devices, be sure to check out my other blog that talks about a few more things you should know. It will save you time!
Wrap Up
Now you know how to get started with managing BitLocker with Intune. You’ve learned what settings are worth configuring in the profile, how it works under the hood on the client, and where to look if you run into errors.
can you upload the pictures again please? Some pictures have not been shown.
I checked the page and all look like they are correctly loading to me. Which ones aren’t loading for you?
Thank you for the great resource.
Unfortunately, not all screenshots are visible in the article.
Which ones aren’t loading for you? They all appear to load fine from my testing.
Hi,
For some reason, I continue to get 128bit encryption on all new devices going through the ESP. How would I go about making the 256bit encryption the default when going through the ESP?
https://www.howtogeek.com/193649/how-to-make-bitlocker-use-256-bit-aes-encryption-instead-of-128-bit-aes/
Good article unfortunatley pictures are not visible it would be good to see your settings.
With or without adblockers no pictures.
Without adblockers no pictures and tons of edverts and trackers otherwise good article.
Also not entirely clear what are you refering to in the section:
BitLocker Client-Side Settings
are those registry keys? are they Administrative templates / CSP (OMA-URI) / else?
Are these settings mandatory or an option?
Again no screenshots.
This section is just explaining where the settings you configure in Intune get populated on the client side. It helps you understand how they work and how to validate.
Will – oh sorry to hear that. Mind sharing what browser you are using and where you’re coming from? I’ve tried multiple browsers and multiple locations, and I can’t seem to reproduce what you are seeing. I still see the pictures. I definitely want to try to solve this.
If I add a computer group to the BitLocker configuration in Intune, the devices in that group get encrypted with BitLocker and managed in Intune – but what happens when I remove that group from the BitLocker Assignment?
I just tested this to make sure and verified the device stays encrypted and the recovery keys remain on the object. If a user has administrative creds and manually disables BitLocker than it will turn off, but will no longer be enforced and turned back on.
Thank you for the article!!
If some windows devices are auto encrypted with 128 Bit encryption method & Intune policy having 256 configured.
So If i apply bitlocker policy on those devices with Intune. Will those decrypt & get re-encrypt with 256.?
Also pls advise the scenarios when bitlocker recovery key will be erased from Intune console.
No – Intune never automatically decrypts disks and re-encrypts with the proper method. You’ll need a PowerShell to do that. You can check out my sample script here: https://github.com/brookspeppin/Blogs/blob/main/3%20Things%20to%20Know%20Before%20Deploying%20BitLocker%20with%20Intune/Enable-BitLocker.ps1
If you have a device that has been completely wiped to have the windows 11 reinstalled, do you have to delete the old BitLocker recovery key in Azure Active Directory and save a new BitLocker recovery key?
No. The next time you enroll you will most likely get a new device ID in Azure/Intune and then a new key will be added. Even if it re-enrolled to the same ID, it would just append a new key on the object.
Great article indeed, thank you.
I have a question. How would I go about upgrading bitlocker encryption to AES256? These devices are already encrypted with bitlocker AES128
Lee – You would need to decrypt them first using command line or Powershell. Then once they are fully decrypted, re-sync intune and it should kick off encryption with the type you specify.
Hey Brooks,
I have a few devices in my tenant that do not have TPM 2.0 due to BIOS reasons I believe. We are a remote business and I cannot get my end user to try to update their TPM. Does pushing BitLocker this way cause any issues for those devices?
Hi Max.The BitLocker profile works fine on devices with TPM version 1.2.
Hey Brooks!
What if they have no TPM? It doesn’t encrypt correct?
Also, when I pushed this to a test device that already had backed up the keys, it re-backed them up to AD. I had 3 keys (OS drive and 2 fixed data drives). Now it has 6 in AD meaning 3 aren’t useable. How do I delete the extra keys from AD?
I’m assuming you mean Azure AD? I’m not aware of any way to delete BitLocker keys that are saved into AAD. There was a bug where if you suspend Bitlocker on a device and then re-sync Intune, it would also re-generate a new key. You can verify what keys are on the box by doing manage-bde -protectors c: -get. I have a script that cleans up keys on the device and then eventually they should be removed from AAD.
$bitlockerVolume = Get-BitLockerVolume C: # Get the Bitlocker information for C:\
$bitlockerKeyProtectors = $bitlockerVolume.KeyProtector # Example result – All saved encryption keys
[array]$recoveyKeyProtectorIDs = ($bitlockerKeyProtectors | Where-Object {$_.KeyProtectorType -eq ‘RecoveryPassword’}).KeyprotectorId # Example result – All saved “Recovery Password” encryption keys
if ($recoveyKeyProtectorIDs.length -gt 1) {
write-host “Multiple Protector IDs detected. Clearing extra keys”
Write-Log -Message “Multiple Protector IDs detected. Clearing extra keys”
Foreach ($RecoveyKeyProtectorID in ($RecoveyKeyProtectorIDs | Select-Object -Skip 1)) {
write-host “Removing Key ID $($RecoveyKeyProtectorID)”
write-log -Message “Removing Key ID $($RecoveyKeyProtectorID)”
Remove-BitLockerKeyProtector -MountPoint “C:” -KeyProtectorId $RecoveyKeyProtectorID
}
}